This is a continuation of my adventures into moving to Visual Studio from the Powershell ISE you can find Part 1 and Part 2 here, they contain concepts we are building upon in here so are worth a read.
Anyway, last time we actually put some (very basic) code into Visual Studio and got it to run, we also created our Visual Studio Team Services workspace and Repo. Now we are going to start building upon that and implement the Git workflow. Part 4 will be how we manage different versions of our code and Hopefully In part 5 we will actually get to writing and debugging PowerShell in Visual Studio using features like intelisense and breakpoints.
If I lose you at any point here, go and read the honestly fantastic guide on the Visual Studio Site https://www.visualstudio.com/en-us/docs/git/tutorial/gitworkflow because its really really well written.
Version Control, Git and a Push me Pull you.
So, what is Git? Git is a version control system, last time we just saved our code locally and run it, now we need to to Push (Upload) our newly written code up to the Repo (Visual Studio Team Services) to we can track changes, colab with others, and allow others to download the code.
It’s important to remember that there are actually at least Two Git repo’s with your code in them. One on your machine and one on Github/Visual Studio Team Services. When you edit and commit the code, you are doing this to your Local repo. You then Push your Commits (Changes) to the Online Repo. But before you can Push your client will also Pull any new changes from the Online repo to your Local repo. If someone else updates the same bit of code you are working on Git will help you decide what bits of code win, then let you Push your content with the amended changes.
Git is also smart about tracking changes separately and this comes in real handy for handling different versions of code (for different scenarios for example) but before we can get into any of that, we need to see how Visual Studio implements Git
Remember the Git controls I mentioned earlier? No? They are in the bottom right corner of the Visual Studio ISE.
Let me explain the icons in a little more detail.
This is the current Git Repo and is the repository for all your stuff. It can contain 1 solution (script) or many, its entirely up to you.
If you are going to need separate Branch management (for larger projects) you are going to want your own repo per project.
Clicking this will take you to the Team Explorer pane to select/manage your Repo
This is the Current Branch and is a fundamental concept of Git.
For now we are going to stick with the Master branch to keep complications down.
the Master Branch typically contains current known good compiling code with extra Branches or Forks for development
Clicking on this allows you to quickly change Branches
This is the Uncommitted Change Counter: These are the files/resources that have changed in your local workspace that haven’t been Committed to your local git repo.
For example, if you have edited a file and havent Commited it yet, you havent told Git what the change was about. Thus it hasn’t tracked the change!
It’s important to note: The version control is not based off Saves but off Commits
Clicking this allows you to Commit your changes to the Local repo
This is the Publish Counter: These are Commits that have been written to your local repo, but not Pushed (Published/Uploaded) to the Online repo.
Clicking this brings up the Sync tab in Team Explorer.
You Sync the changes once you are ready for them to be shared with your team/stored online. Typically after a successful test (Especially in the Master branch!) as the idea is anyone else with access to the Git repo can Clone the repo and work with the code.
With me so far? okay! So. The workflow is;
Clone (copy the code to your machine, once off)
Save (saves the code as a file)
Commit (Saves the code into Git, tracks the changes)
Pull (Grab any other commits that have been synced with the online repo)
Resolve (if there are conflicts, fix them)
Push (Publish the amended code w/commits for version tracking)
Okay, enough theory, Lets actually do it.
As you can see I have 5 uncommitted changes from creating our project from before.
As this is the first time I’m publishing and we don’t have stable code yet, its fine to publish into the Master branch.
So we click on the Uncommitted Change Counter to Commit our changes.
Visual Studio will now prompt you to explain the changes in the Team Explorer pane as well as listing the changes you are about to Commit
This is also our chance to add any other files that are needed by the script in the Repo (For example a template file) by just dragging them into the “Related Work Items” section.
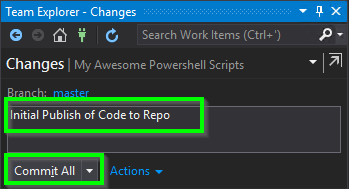
Now, we enter a useful description in the commit message and hit “Commit All”
There is no need to list the exact changes you made line by line (Git does this for you) but it needs to make sense when you review it later when working with branches.
Remember that you might have to read these messages in 10 years’ time. So it makes sense to explain well.
Try and use phrases like “Fixed issue with input in Get-Brains Module when input was rotten” instead of “Bug-Fixes”
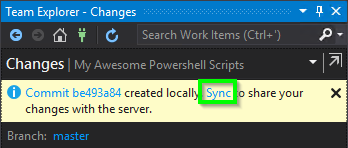
Once you commit the change, Visual Studio will let you know the Commit ID and remind you to Sync (Pull then Push) your Repo
Click Sync to push your code into the Online repo
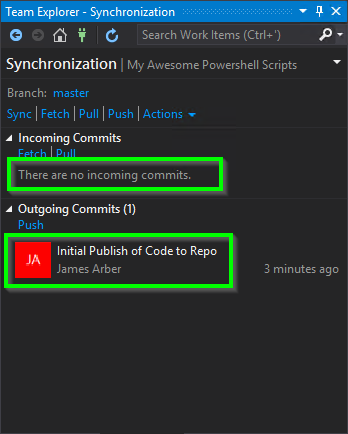
Once again the Team Explorer window will update with information.
In this case there are no Commits in the Pull
And our most recent Commit is in the Push
Click on “Sync” to update the Repos accordingly
(Note: this is the step we would resolve any conflicts or errors if the repo’s were too far out of sync or the same code had been adjusted)
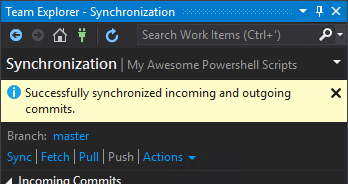
You should get a nice prompt that tells you the Sync was a success
Great. So now what happens when I make changes?
Simple. Save, Commit, Sync
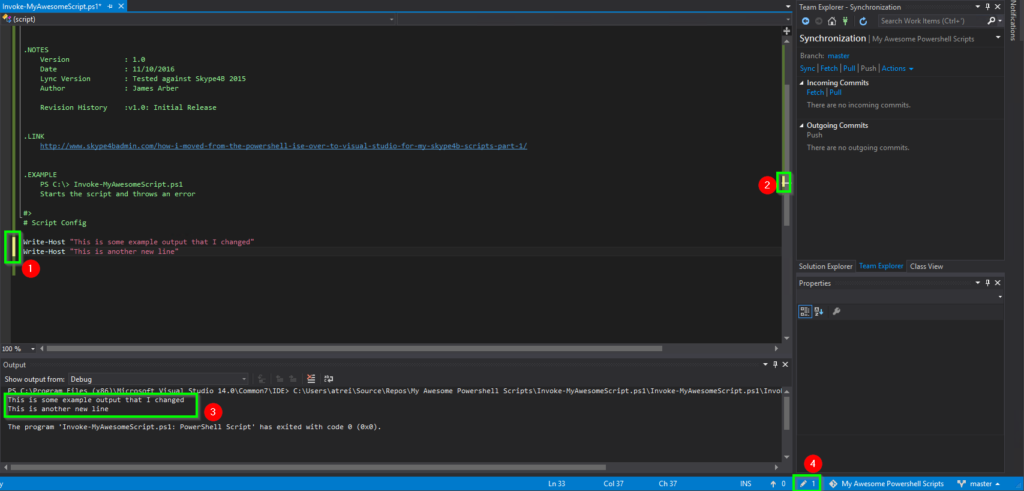
Lets change some of the code.
In this example, I changed the last line to read
Write-Host “This is some example output that I changed”
And added a new line
Write-Host “This is another new line”
- Notice the Green bar changed to Yellow to indicate we changed the Lines?
- The colours also appear in the scroll bar. Red is really handy for finding errors
- You can see the updated debug output
- You can see the change counter has increased
Note that the change counter has gone up to 1? That’s because we only changed 1 file.
Don’t think though that Git can only manage whole files, theres alot more smarts to come.
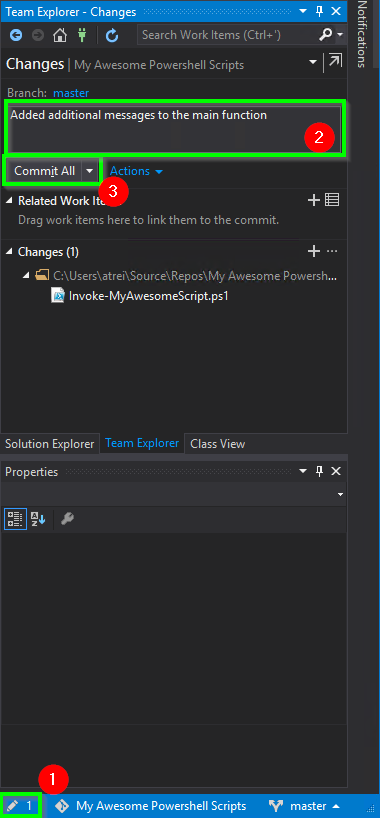
Lets go ahead and commit that.
- Click the change counter
- Add the commit details
- Click Commit All
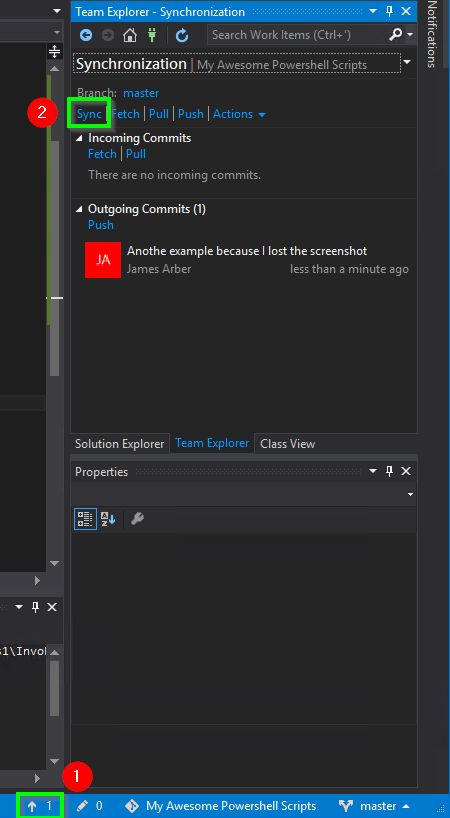
Notice the Publish Counter increased?
That’s because there is a Commit waiting to be Pushed.
Let’s quickly review the Commit before publishing it to show some of the version management.
Click the Publish Counter and then double click on the Outgoing Commit
You should be presented with details of the Commit itself.
Here we can see what files are included in the Commit and if we want more detail, we can drill down and Diff the files inside Visual Studio
Right click the script and click Compare with Previous
You can see here that Visual Studio gives a very powerful, very graphical representation of the differences between files.
Not only is the background of the text red or green depending on if the content was added or removed, but the scroll bar shows this as well. Handy for larger scripts.
If we were resolving a conflict here, we could also pick and choose what changes to keep in each instance. But I’ll save that for another day
If your happy with the changes, you can then Push them into the Online repo.
Click the Publish Counter again, and then click Sync
Thats it, you have now uploaded you code to the repo and the changes have been tracked, we can move back and forth between different versions. Branches and even re-intergrate code
Next time I’ll get into Branches, Merge and Pull Requests and explain this all in more detail.
I hope you find these guides helpful as they are alot of work. Leave a comment below with any ideas, suggestions or feedback.




Pingback: Move Powershell ISE to VisualStudio Part2 | Skype4BAdmin.com